Sensu Go is a free and open source infrastructure and application monitoring tool for Linux based operating system. It is used to monitor servers, services, applications and send you notification via e-mail. Sensu Go automates the registration and de-registration of servers, containers, services, apps, functions, and connected devices. It collects basic system metrics, including CPU, memory, and disk usage. You can use Sensu to trigger service restarts or execute custom scripts when problems are detected.
In this tutorial, we'll show you how to install Sensu Go on Ubuntu 20.04 VPS.
Prerequisites
- An Ubuntu 20.04 server installed in your system.
- A root user or user with sudo privileges configured in your server.
Getting Started
Before starting, you'll need to update your system packages to the latest version. You can update them using the following command:
# apt-get update -y
Once all the packages are updated, install other required dependencies using the following command:
# apt-get install curl gnupg unzip wget -y
Once all the dependencies are installed, you can proceed to install the Sensu Go.
Install Sensu Go Backend
By default, Sensu Go is not included in the Ubuntu 20.04 default repository. So you'll need to install Sensu backend repository to your system. You can install it using the following command:
# curl -s https://packagecloud.io/install/repositories/sensu/stable/script.deb.sh | bash
After adding the repository, update the repository and install the Sensu backend with the following command:
# apt-get update -y
# apt-get install sensu-go-backend -y
After installing Sensu Go backend, you will also need to download the Sensu Go configuration file to the /etc/sensu directory. You can download it using the following command:
# curl -L https://docs.sensu.io./sensu-go/latest/files/backend.yml -o backend.yml
# mv backend.yml /etc/sensu/backend.yml
Next, start the Sensu backend service and enable it to start at system reboot:
# systemctl start sensu-backend
# systemctl enable sensu-backend
You can now verify the status of the Sensu service using the following command:
# systemctl status sensu-backend
You should see the following output:
● sensu-backend.service - The Sensu Backend service.
     Loaded: loaded (/lib/systemd/system/sensu-backend.service; disabled; vendor preset: enabled)
     Active: active (running) since Wed 2021-04-07 15:13:42 UTC; 7s ago
   Main PID: 2721 (sensu-backend)
      Tasks: 9 (limit: 2353)
     Memory: 16.7M
     CGroup: /system.slice/sensu-backend.service
             └─2721 /usr/sbin/sensu-backend start -c /etc/sensu/backend.yml

Apr 07 15:13:44 Ubuntu2004 sensu-backend[2721]: {"component":"store","key":"/sensu.io/api/enterprise/secrets/v1/providers/","level":"debug","m>
Apr 07 15:13:44 Ubuntu2004 sensu-backend[2721]: {"component":"web","level":"info","msg":"starting webd on address: [::]:3000","time":"2021-04->
Apr 07 15:13:47 Ubuntu2004 sensu-backend[2721]: {"cache_version":"v1","component":"cache","level":"debug","msg":"rebuilding the cache for reso>
Apr 07 15:13:47 Ubuntu2004 sensu-backend[2721]: {"cache_version":"v2","component":"cache","level":"debug","msg":"rebuilding the cache for reso>
Apr 07 15:13:47 Ubuntu2004 sensu-backend[2721]: {"cache_version":"v1","component":"cache","level":"debug","msg":"rebuilding the cache for reso>
Apr 07 15:13:47 Ubuntu2004 sensu-backend[2721]: {"cache_version":"v2","component":"cache","level":"debug","msg":"rebuilding the cache for reso>
Apr 07 15:13:47 Ubuntu2004 sensu-backend[2721]: {"component":"tessend","level":"debug","metric_name":"event_count","metric_value":0,"msg":"col>
Apr 07 15:13:47 Ubuntu2004 sensu-backend[2721]: {"backend_id":"af1cf03c-ba26-48d1-86a4-e308d3c012c9","component":"metricsd","level":"debug","m>
Apr 07 15:13:48 Ubuntu2004 sensu-backend[2721]: {"backend_id":"af1cf03c-ba26-48d1-86a4-e308d3c012c9","component":"metricsd","level":"debug","m>
Apr 07 15:13:49 Ubuntu2004 sensu-backend[2721]: {"backend_id":"af1cf03c-ba26-48d1-86a4-e308d3c012c9","component":"metricsd","level":"debug","m>
Configure Sensu Admin Password
Next, you'll need to create an admin username and password to access the Sensu Go dashboard. You can create it using the following command:
# sensu-backend init --interactive
You will be asked to provide Sensu admin username and password as shown below:
? Cluster Admin Username: sensuadmin
? Cluster Admin Password: *************
? Retype Cluster Admin Password: *************
{"component":"backend.seeds","level":"info","msg":"seeding etcd store with intial data","time":"2021-04-07T15:14:24Z"}
{"component":"store","level":"warning","msg":"migrating etcd database to a new version","time":"2021-04-07T15:14:24Z"}
{"component":"store","database_version":1,"level":"info","msg":"successfully upgraded database","time":"2021-04-07T15:14:24Z"}
{"component":"store","database_version":2,"level":"info","msg":"successfully upgraded database","time":"2021-04-07T15:14:24Z"}
Access Sensu Go Web Interface
At this point, Sensu Go is installed and listening on port 3000. Now, open your web browser and access the Sensu dashboard using the URL http://your-server-ip:3000. You will be redirected to the Sensu login page:

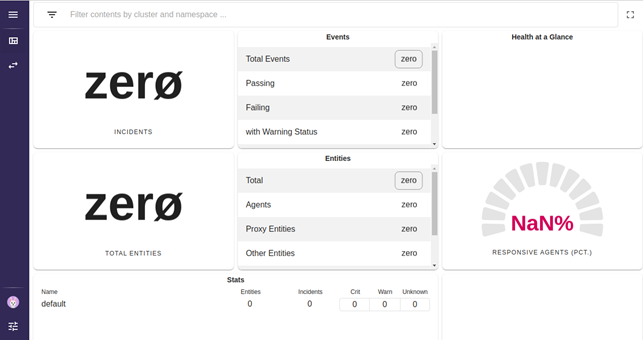
Provide your admin username, password and click on the "SIGN IN" button. You should see the Sensu dashboard in the following page:

Install Sensuctl
Sensuctl is a command-line utility that will help you to manage and monitor the Sensu Go from the command-line interface.
First, add the Sensuctl repository with the following command:
# curl -s https://packagecloud.io/install/repositories/sensu/stable/script.deb.sh | bash
Next, install the Sensuctl using the following command:
# apt-get install sensu-go-cli -y
After installing the Sensuctl utility, run the following command to configure Sensuctl:
# sensuctl configure
Provide the same admin credentials that you have created before:
? Authentication method: username/password
? Sensu Backend URL: http://127.0.0.1:8080
? Namespace: default
? Preferred output format: tabular
? Username: sensuadmin
? Password: *************
Install Sensu Go Agent
Now you'll need to install Sensu Go Agent package on each system that you want to monitor. In this section, we will install Sensu Go agent on the Sensu Go server.
You can install it by just running the following command:
# apt-get install sensu-go-agent -y
Once the installation is completed, download the agent configuration file with the following command:
# curl -L https://docs.sensu.io/sensu-go/latest/files/agent.yml -o agent.yml
# mv agent.yml /etc/sensu/agent.yml
Next, start the agent service using the following command:
# systemctl start sensu-agent
You can also verify the agent service with the following command:
# systemctl status sensu-agent
You should get the following output:
● sensu-agent.service - The Sensu Agent process.
     Loaded: loaded (/lib/systemd/system/sensu-agent.service; disabled; vendor preset: enabled)
     Active: active (running) since Wed 2021-04-07 15:19:47 UTC; 12s ago
   Main PID: 3744 (sensu-agent)
      Tasks: 8 (limit: 2353)
     Memory: 3.3M
     CGroup: /system.slice/sensu-agent.service
             └─3744 /usr/sbin/sensu-agent start -c /etc/sensu/agent.yml

Apr 07 15:19:47 Ubuntu2004 sensu-agent[3744]: {"component":"agent","level":"info","msg":"successfully connected","time":"2021-04-07T15:19:47Z"}
Apr 07 15:19:47 Ubuntu2004 sensu-agent[3744]: {"component":"agent","header":"Accept: [application/octet-stream application/json]","level":"deb>
Apr 07 15:19:47 Ubuntu2004 sensu-agent[3744]: {"component":"agent","format":"protobuf","level":"debug","msg":"setting serialization/deserializ>
Apr 07 15:19:47 Ubuntu2004 sensu-agent[3744]: {"component":"agent","header":"Content-Type: application/octet-stream","level":"debug","msg":"se>
Apr 07 15:19:47 Ubuntu2004 sensu-agent[3744]: {"component":"agent","content_type":"application/octet-stream","level":"info","msg":"message rec>
Apr 07 15:19:47 Ubuntu2004 sensu-agent[3744]: {"component":"agent","level":"debug","msg":"received an entity config from the backend","time":">
Apr 07 15:19:47 Ubuntu2004 sensu-agent[3744]: {"component":"agent","level":"debug","msg":"successfully received the initial entity config","ti>
Apr 07 15:19:47 Ubuntu2004 sensu-agent[3744]: {"check":"keepalive","component":"agent","entity":"Ubuntu2004","event_uuid":"0064d633-12fa-4292->
Apr 07 15:19:47 Ubuntu2004 sensu-agent[3744]: {"component":"agent","content_type":"application/octet-stream","level":"info","msg":"message rec>
Apr 07 15:19:47 Ubuntu2004 sensu-agent[3744]: {"component":"agent","level":"debug","msg":"received an entity config from the backend","time":"
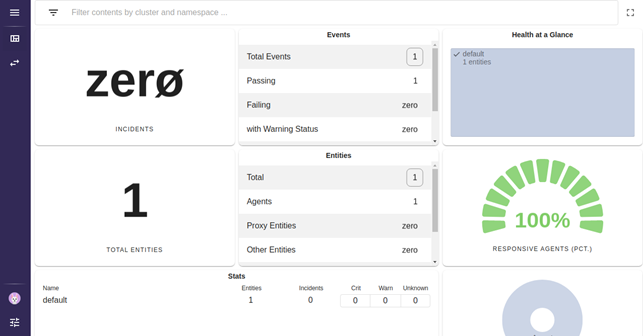
Now, go back to the web browser and refresh the Sensu Go page. You should see the following page:

Conclusion
In the above tutorial, you've learned how to install and configure Sensu Go monitoring tool on Ubuntu 20.04 server.
You can now add more nodes and start monitoring from the Sensu Go dashboard!
Note
Please, remember that, ir order for this tutorial to work, you must open firewall 3.000 in you control panel.